Animation Fundamentals - Final Project: Action Animation
2.7.2024 - 28.7.2024 / Week 11 - Week 14
Adriena Tan Yan Zi / 0351236 /
BA of Design (HONS) in Creative Media
Animation Fundamentals
Final
Project
Instructions
Final Project: Action Animation
FINAL PROJECT : PHYSICAL ACTION SEQUENCE ANIMATION
1. Use your character from your previous project 1, animate a 5 second
physical action sequence.
2. You can use motion library as reference from this youtube channel:
https://www.youtube.com/c/motionactorinc
3. Create a storyboard that visualises the key moments, actions and
emotion of the scene. Incorporate variety of camera shots, angles and
visual continuity to enhance the visual storytelling.
4. Create a project in Adobe Animate. Set the setting as 24fps, 16:9
aspect ratio with 1280 x 720 (HD720p) resolution.
5. Perform all the processes that you have learnt in the previous lesson
to produce the final animation such as animate the animation from rough,
tie down, clean up and colouring.
6. The animation should show the quality of appeal, fluidity, flexibility
and clarity and the understanding of cinematography and editing.
7. Edit the final animation with sound effects and background music.
8. Submission should include:
1. Storyboarding (pdf) - 10%
2. Final animation (mp4 format) -20%
3. E-portfolio (Exercises, Project 1,2 & Final) - 10%
9. Upload progress and final work on your e-portfolio and update the link
on MYTIMES platform as submission.
10. Deadline for submission is by Week 14.
Storyboard
Storyboard #1
Storyboard #2
Tie down
Action 1
Reference
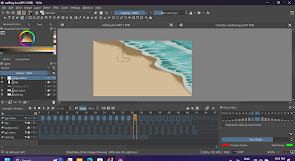
I was planning out the frames of the waves to see how it will map out the pattern of the crashing waves on the sand. Analysing the pattern and see how many in between I should add in to make the animation smoother. I had to find an example on Pinterest to analyse how the flow would look like. I also had animate the waling leg towards the waves pausing indicating that the girl is staring out into the distant deep in thought.
Action 1 tie down.mp4
Action 2
Reference
Initially, I mapped out the reflection of sunlight on the ocean's surface, adjusting the patterns as needed. I analyzed several videos and illustrations to understand how it works before creating my own version. Then i had to animate the girl diving into the as she is a mermaid, to get ready for the transformation, but in the mean time I had to look for the swimming animation guide to reference how the legs would move.
Action 2 tie down.mp4
Action 3
I wanted her to transform from a human into a mermaid in the deep ocean which I also had to animate the magical swirl that was going around her to further indicate the magic that was surrounding her. Also adding a little bit of her swimming with her legs in the end.
Action 3 tie down.mp4
Rendered and coloured animation
Action 1
Reference
The colouring and rendering the waves and the sand wasn't too much trouble as I already had the tie down version to guide where everything would go. I found it fun to animate the footprints on the sand however and it was something new for me.
Final Action 1.mp4
Action 2
Process
I found the coloring and rendering process fairly straightforward. However, one challenging aspect was creating the splash, waves, and bubbles surrounding the character. Capturing the dynamic motion and realistic interaction of water with the character required multiple adjustments and refinements. Additionally, I had to modify the hair pattern to make it appear more natural, which involved studying real-life references and tweaking the hair strands to achieve a more lifelike look. These elements were crucial for enhancing the overall realism and fluidity of the model.
Final Action 2.mp4
Action 3
References
Process
Rendering the background i needed a reference online to see what would a deepsea looks like. Making the character transform i didn't wanted to make it too complicated to I just have it transform with the fade in effect. The magic I initially wanted it to be a blinding light so that the viewers wouldn't see a clear transform but i ditched the idea thinking the swirl would make the transformation clearer and more noticable.
Final Action 3.mp4
Final rendered layout designs
Action #1 layout design
Action #2 layout design
Action #3 layout design
Final animation
Final animation.mp4
Feedback
Reflection
For this project, we were tasked with creating a 5-second action animation featuring our original character performing any action we desired. After considering a few ideas, I decided on a transformation sequence. Although the animation process was tiring, it was also enjoyable as I watched my vision come to life, making all the effort worthwhile.
I recognize there are many flaws in the animation that need improvement to make the actions appear more natural. While I accepted these mistakes, I wished I had more time to rework the entire sequence to make it smoother and more aesthetically pleasing in all aspects, including drawing quality. These mistakes and flaws provide room for growth, allowing me to produce better quality work and become more time-efficient, which I strive to improve every day.
I also need to work on the timing of my animation, as it is crucial for demonstrating the flow of actions. Looking at the examples from senior students was both inspiring and overwhelming, as I wondered when I would reach their level of expertise. However, this also motivated me to work harder and improve my skills as I approach the next semester.


.gif)


Comments
Post a Comment