Project (Final) - Character Modeling
26/06/2024 - 28/07/2024 / Week 12 - Week 14
Adriena Tan Yan Zi /
0351236
3D Modelling / Bachelor of Design (Hons) in Creative Media
Final
Project - Character Modeling
Instructions
PROJECT III (FINAL) : ORGANIC MODELING (CHARACTER)
1. You are required to produce an organic 3D model of a character from a model sheet. The example pictures shown are just a sample and demo purposes. You may search the image reference and model sheet of your favourite character.
2. Model the character using polygon tools and techniques based on what you have learnt.
3. Apply the right material and texture to give its appearance.
4. Apply three points lighting and render.
5. Use Eevee or Cycle rendering for final output. Output size is 1280 x 720 with png format.
6. Upload in your e-portfolio and update the link on TIMES platform as submission.
7. Submission is on Week 14.
Final Project - Character Modeling
Requirements:
- Output size: 1280 x 720
- Format: .png
- Rendering engine: Eevee or Cycles
Model sheet
I was on Pinterest once again to find a few reference sheet of some other characters and to review the options i have to model that will still be within my skillset. I had Garu in mind since the beginning as he would fit well with the rest of my projects where i built a katana and a tatami room.
Fig. 1.1 Garu's model sheet.jpg
Finding his complete model sheet was a bit challenging so I had to find them separately and the side view is actually a scene from the cartoon itself.
Modeling in Blender
Fig. 2.1 Modeling head and body
I modeled the head with the cub and subdivided it once so that i am able to to bridge edge loops between the head and the body. For the body i model it into shape with the use of a cylinder and loop cut it so I have more control with each part.
Fig. 2.2 Modeling hand
Inserting an 8 sides cylinder to for the arm and another subdivided cube as the hand for Garu. I joined and bridge them together attached to the body. I had to try around how many face i needed for each new mesh i entered to make sure they wont create and N-gon later on.
Fig 2.3 Modeling hair and and carving the food
I made the hair with the scale tool but didn't attach it to the head as i thought it looked weird once I added subdivision modifier even with enough support of loop cuts. In the end i just added the bevel modifier and carved out the hood around Garu's face using the knife tool. Fig. 2.4 Cutting out an eye
I cut out and extruded his eyes with the knife tool. I had to go around and experiment to see which works. I wanted to try using the circle mesh to create a guide but it didnt work out nice and i just cut it with the knife tool and inset and extrude again.
Fig. 2.5 Adjusting the wireframe
Here I'm just going back and forth fixing the space between his eyes and the eye shape before and after subdivision tool. Adjusting the wireframe as I go.
Colouring in blender
Fig. 3.1 Colouring the hair
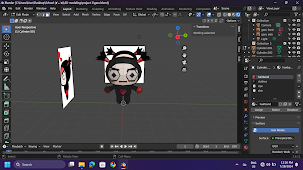
For Garu, I didn't want to do too much to the rendering or add too much texture as the original model doesn't show to have much of any texture on him. So I start out with the basic colouring first and adjusting the tone of each colour referring to the reference sheet.
Fig. 3.2 Adding skin colour
I find selecting the faces and colouring is easier without the subdivision modifier on. I had to keep in mind that the lighting is not set yet, some of the colours are not showing well because of the lighting i have mistaken it to not have colour because of the darkness.
Fig. 3.3 Rendering with texture
Here I started adding some metalic and roughness to some parts so that the texture would stand out a little bit more.
Fig. 3.3 Rendering with texture
Once I'm satisfied with the overall look and colour of Garu, I moved on to redering with lighting using the Eevee engine first.
Rendering in blender
Fig. 4.1 Rendering lighting
I was experiencing with how many light would i need to get the colours on Garu to stand out and discovered that I needed 2 - 3 lighting on different angle.
Fig. 4.2 changing background colour
I playing around with the position of the lighting and switching the colors to see which one makes Garu's colour pop asking around for my friends and sibling's opinion.
Fig. 5.1 Rendered final model blue with cycle engine.png
Fig. 5.2 Rendered final model yellow with cycle engine.png
Final results
Fig. 6.0 Rendered final model with cycle engine.png
Fig. 6.1 Rendered final model wireframe.png
Feedback
Specific Feedback:
Week 14: Looks good, can start with the colouring and maybe can explore other poses for the character.
Reflection
For this project, we are required to create an organic 3D model in Blender of any character we choose. I decided to model Garu, feeling confident in my ability to do it well. However, due to the demands of other assignments that had earlier deadlines, I didn't have much time to work on this project initially. When I finally had time to focus on it during class in week 14, I was fortunate to have my friend's help. She confirmed the methods I was using, which allowed me to speed up my modeling process significantly within a single class. I received approval from my lecturer, which motivated me to further refine my model. The subsequent steps of coloring and rendering went smoothly, and I was able to resolve any issues that arose along the way.
.jpg)


Comments
Post a Comment