Project 1 - Character Design & Layout Design
14/05/2024 -28 /05/2024 / Week 4 - Week 5
Adriena Tan Yan Zi / 0351236
Animation
Fundamentals/ Bachelor of Design (Hons) in Creative Media
Project 1 -
Character Design & Layout Design
.jpg)
Lectures


Instructions
Project 1A - Character Design
For the first part of the assignment, we are required to design a character that could walk on 2 legs as it will be used for our final project later on.
Requirements:
- Set the character description (Age, Gender, Weight, Attitude, Personality)
- A turnaround sheet (front, side, back and ¾ view perspective)
- Pose sheet (Various poses in different emotion) - 5 poses *full body
- Character facial expressions - 5 expressions * focus on chest up
Things to research and study before designing:
- Shape language
Example: The character's shape language should reflect her personality, with soft and curved shapes to convey kindness and rounded edges to suggest insecurities. The shape language can also include angular shapes to convey determination and strength.
-Proportion
Example: The character's proportions should be proportionate to the age and gender, with emphasis on her eyes and facial features to convey emotions and expressions.
-Silhouette
Example: The character's silhouette should be distinctive and easily recognizable, with a clear and readable design that stands out from the background and other characters in the scene.
-Line of action
Example: The character's line of action should convey movement and personality, with dynamic poses that suggest the character’s attitude.
-Colour
Example: The character's colour scheme should be vibrant and appealing, with warm colours and cool colours to convey certain meaning.
Reference and analysis
In class, we were taught how to measure the propotion of a few popular characters and pick a few out to analyse their similarities to take into part of our inspiration while designing our own character. We were shown a few example on how to measure the amount of body propotion and what usual characteristics that accompany these body propostions.
I had a primary idea of making a character that is a female young adult, therefore i searched up a few exsiting cartoon characters that i'm familiar with as they were part of my childhood.

I have analysed some of my favourite characters from my childhood shows like Stella from Winx, Shego from Kim Possible, Fluttershy from Mlp and Draculaura from Monster High. After analysing i realised that they have quite a few similarities in body propotions as they are all made out of 6 parts of propotions and they all comes in bright colours which is what captured my attention to them as a kid.
Designing an original character
Before starting to design the visual and body propotions of these characters, I had to give this character some basic traits and personality to have a rough guideline on their physical appearanc, their personality and some unique traits as well.
Character informations:
- Age: 325 years old (young mermaid)
- Gender: female
- Weight: 136kg (heavy tail)
- Height: 176cm (with tail), 173 (with legs)
- Personality: reserved, shy, quiet, easily fascinated
- Attitude: Usually calm, stays in her shell, can get overly excited when she discovered new things
Creating the turnaround sheet

Here I'm just rough sketching her mermaid form first before moving on to the character perspectives.

After doing the clean sketch of the front perspective, i moved on to the side perspective.

Cleaned up a bit and moved on to the back perspective.

Then, i did the 3/4 view as well with a few reference i search up in pinterest.

Finally this is the rough sketch of the final turnaround sheet for her mermaid form.

I had to do it for her human form as well, to keep the consistency I switched out her tail to human legs.

Here is a reference i looked up for the 3/4 view as I was not sure how it would loo like.

Redoing linart to make sure the final result is clean.

Measuring the propotion for both the human and the mermaid form as they are both slightly different from each other, the mermaid one is taller which i had to make sure they stayed taller throughout.
Final character's turnaround sheet (mermaid form)


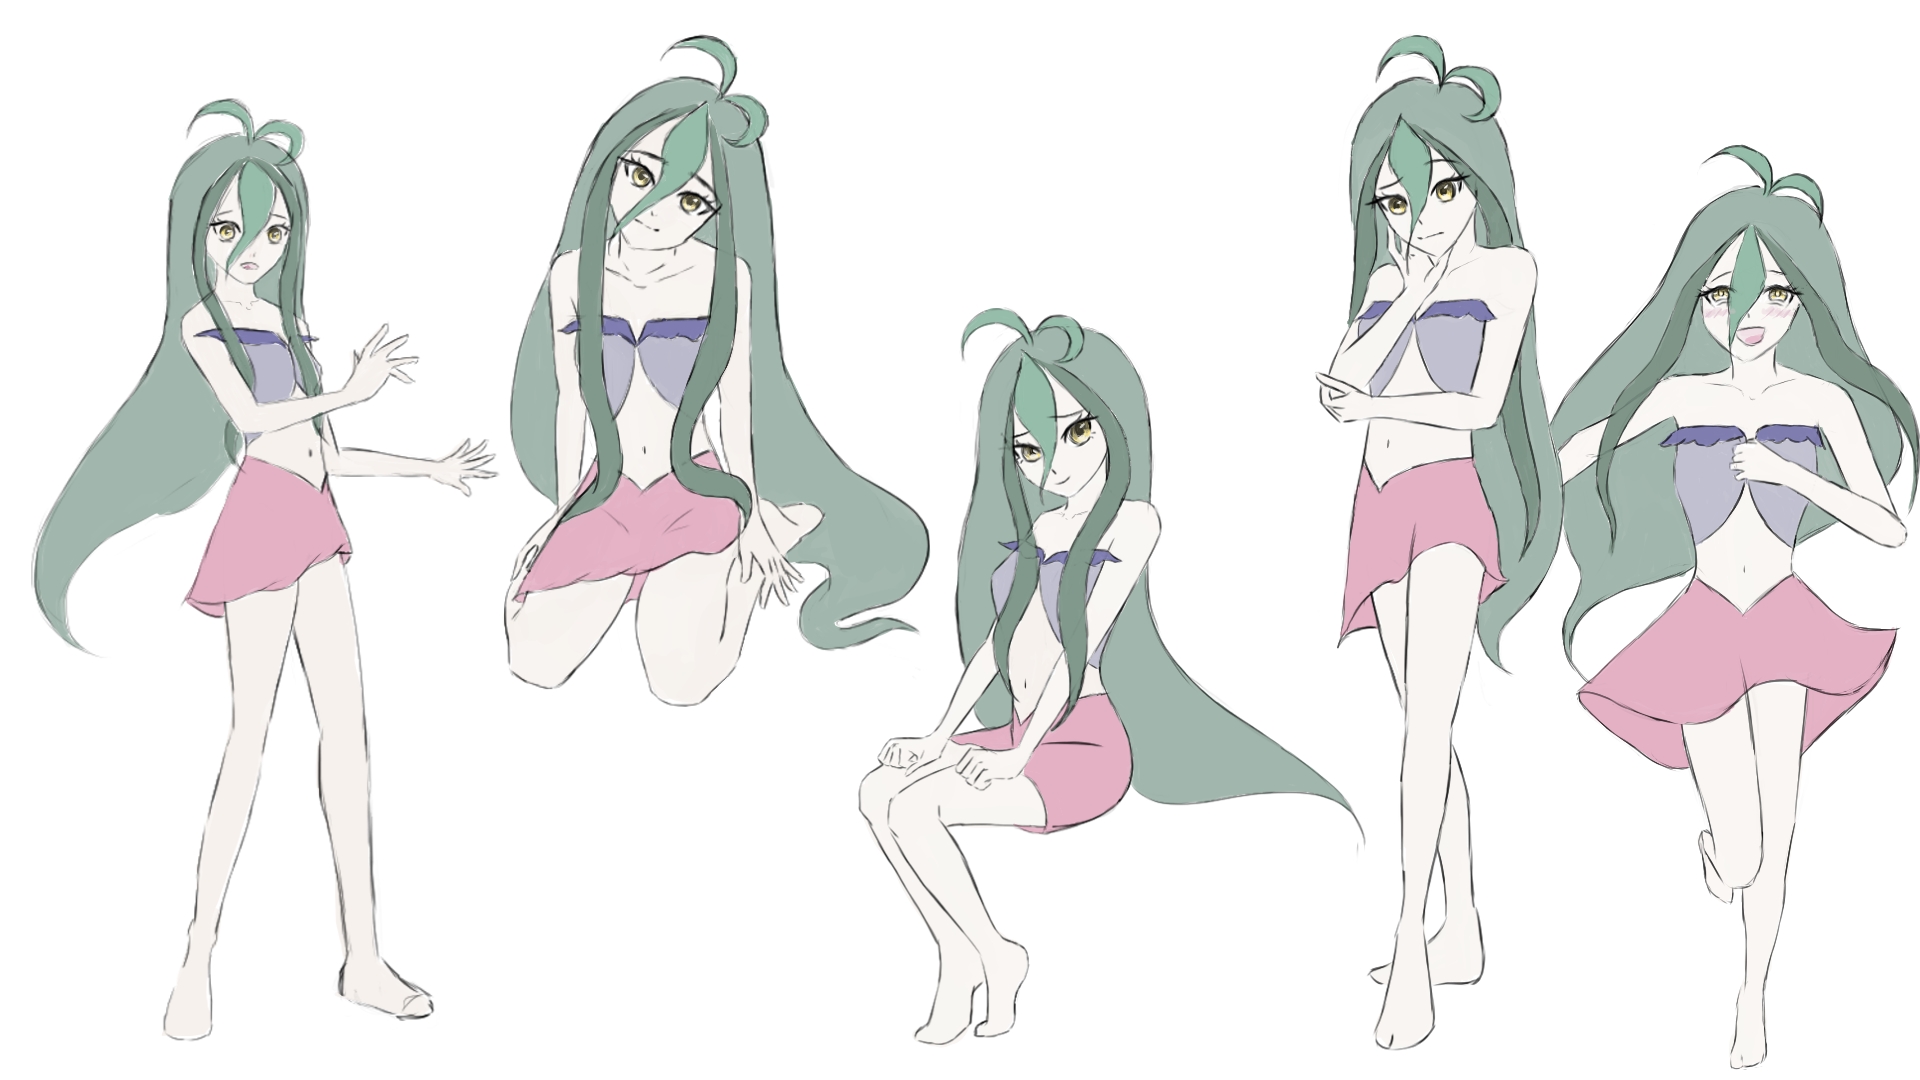
Creating the pose sheet

The first post is a simple pose of her finsing something new on land and she was surprised to have seen it. I started sketching the body frame with guides.

Once I got the propotion and pose right, I worked on her facial expression.

Next, I drew a pose of her sitting down on her shin, looking up at the person she just met as she had just fallen down.

For her hair, I had to do it differently from the rest of the poses so far as when she was sitting down, tilting her head, her hair should be able to to land on the ground as it is usual the length that reaches her hip.

Here, I just completing the outfit and make sure the necessary creases are there to further prove the soft fabric that she is wearing.

For the 3rd pose, I want to portray her usual image which is calm and quiet, usually minding her own business sitting on top of a rock by the sea side, she looks over as someone approaches her, therefore her pose.


Fo the 4th pose, I wanted her to be deep in thoughts as she is pondering upon her new discovery on the land. I had to look up a reference from pinterest to pportry tthis particular pose better.

I'm finally happy with the body propotion and facial of this pose.


Lastly, I had to draw her curios and excited nature as she was running happy towards the land. I had to search up a reference for this as well to further sudy how her body propostion would look as was running.
Designing character facial expression

For facial expression, we were asked to draw the character from chest up perspective so I had to sketch out a basic frame of her face and body. Copy and paste so they are consistent.

It was a little hard for me to imagine her expressions as her character is not very expressive, So i had them as the same pose since she doesn't express much with her body most of the time.


I did her expression and colour along the waty as well to get an idea of what she would really look like. did her normal expression first then moved on to her being glad.

Furthermore, I moved on to drawing the rest of her basic expressions like happy, annoyed, sad and shocked which i think are the ones that suited her character the most.
Final character expression sheet

Rendered character in human and mermaid form

Project 1B - Layout Design
Finding reference
Before I started sketching, I needed to do some research and ideation brain storming on what kind of background to consider drawing that fits the character. In this case, since my original character is a mermaid that has the ability to transform back and forth between her human and mermaid form, I had an idea for her to be standing by the shore staring into the distance missing her home.
To find reference and the kind of artstyle i'm going for, I had to look up shore illustrations to somewhat get an idea on what my version of a shore would look like.

I found this plain horizon and see scenery illustration and thought I can do something like this for the background before the shore. It looked serene and simple which protray the character's thought and personality well.
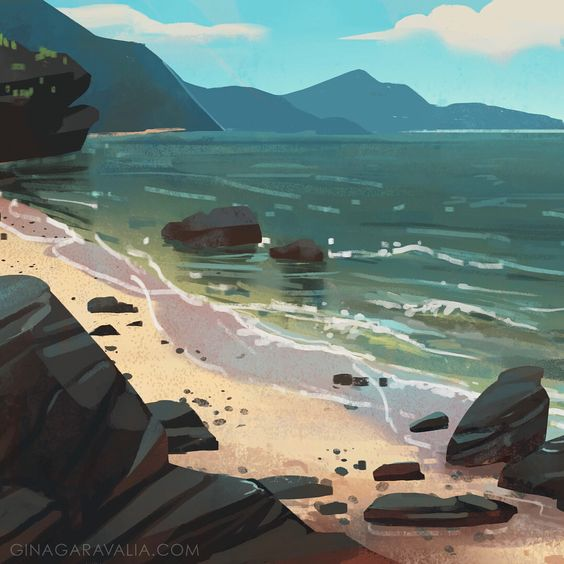
Then I needed and idea on the actual sand part, had to see what angle would be the best to draw so the screnery doesnt not look cut off. In this picture, I studied the placement of the overall layout and how the water and waves would look like in the sea and when it reaches the ground.

Found another reference to student the placement and angle of everything.
Rough sketching


To start off the sketch, I first used the line tool to determine the ratio between the horizon and shore line so it would make sense, and to keep the balance between both parts. Then I sketched a moon in the middle and added some rocks to the beach.


To me, the main appeal of this layout design would be the clouds around the sky, I had to sketch them more scattered with differen degree of thickness shown through opacity so the backgorund look more realistic.

Finally, I cleaned up the sketch and replca some minor details to tie the whole layout design together for this clean sketch.


After sketching, I needed to find some other scenery illustration reference on Pinterest to research on the colour palette and vibe that would fit the character well. Initially I wanted to go for a normal daytime kind of colour palette on the beach but I figured it would be more emotional for the character to be alone at night or dusk. In the end I decided to went for a dark twilight colour palette which I then started out with light blue as the base colour then added shadow.


Once I blended the sky to the colour I wanted, I slowly added in the clouds with less opacity and colour so they would fit the color of the sky better. I put the opacity of my brush low so I can achieve the half transparent thing cloud as it slowly fades into the sky.


Then I moved to colour in the middle section with my sketch as guide along the way. To finish the second layer I added the reflection and light from the moon and shadow.


Then I moved on to paint the rocks on the shore the darkest colour and added highlight. Only highlighting some of the top parts of the rocks as the light hits.

Final Layout Design


Feedback
Week 5: The character is nice, towards the anime style. I can look for reference from Disney.
Week 7:
Try to label each emotions so of the character,
Try to label each emotions so of the character,
Put some margin in each sheet, he suggested to scale down everything.
Poses look good.
Poses look good.
For the reference sheet, the lineart could be darker as it looks a bit washed out.
Week 10: Was suggested to make the necessary changes according to the photo so the propotion of the entire setting makes more sense, following the rule of third. The rest is okay.

Reflection
Working on this assignment was both enjoyable and exhausting. The fun part was having the freedom to design any characters as long as they walked on two legs. However, meeting the various requirements for each sheet was tiring. Going from a blank canvas to a fully rendered reference sheet in just two weeks was overwhelming. It was challenging to grasp the fundamentals of creating a basic character silhouette, not to mention maintaining the characteristics and consistency of style throughout the drawing process. This difficulty was likely due to my lack of familiarity with illustration. Using the drawing program Krita was new to me, so I spent more time figuring out the basic tools and how to use them than actually drawing. Additionally, having a shaky hand is not helpful when doing line art.
Comments
Post a Comment